tirsdag 16. april 2013

Happy news, and the color blue!


I have some wonderful news to share today. A few days ago I was asked to join the Norwegian Copic Marker team! Wohoo! I am still dancing with joy! I am so proud and honored to join the talented ladies of the CMN team.
God morgen! Jeg har en super nyhet å dele med dere i dag! Siv fra Copic Marker Norge ringte meg for noen dager siden og inviterte meg til å bli med som dt!!! Åh, jeg ble så glad! Så klart svaret var et rungende ja!!! Utrolig moro å bli spurt om å være med i en gjeng med så mange dyktige damer!

Her kommer mitt første kort som DT medlem. Utfordringen denne ganger er den flotte skissen som du finner under her, og så skal du bruke fargen blå! 

Here is my first DT card for CMN.
This fortnight's challenge is:

Use the sketch and the color blue.

Here's my card:
I used a gorgeous Saturated Canary image; 
The papers are Maja Design Vintage Spring Basic.
The flowers are WOC, and the lace is from my stash. I used a spellbinder die around the image. THe beautiful vintage pearl brads are from the Live & Love Craft Store. The blue ribbon is part of a candy I won from my lovely blogging friend Dorothy from Holland.


Copcis used:
Skin: E13-11-00-000, W3, R32-30
Hair: E44-43-42-41-40, W7
Greens: G99-94-82-40-21, W7 (for the grass)
Blues: B97-95-93-91, W3
Greys: W7-5-3-1-00
Sign: E39-37-35-33-31-30, W3
Ground: E33-31-30, W3

Here's the sketch:
Hurry over to the CMN blog to see the gorgeous inspiration from the rest of the DT and join in the fun!
Skynd deg over til Copic Marker Norge for å se de lekre inspirasjonsbidragene fra resten av designteamet og bli med på utfordringen! 

I would like to enter the following challenge:
Saturated Canary Challengeblog: #41 Anything Goes 

Takk for at du kikker innom bloggen min i dag! 
Thanks for stopping by my blog today, wishing you a creative day!

Crafty hugs, 

torsdag 11. april 2013

Paper bag purse- tutorial

***


Her kommer en tutorial jeg laget for Ett Trykk i februar:  Hvordan lage en papirpose eske.
Good evening my dear followers!
I thought I would display another paper bag tutorial I made for Ett Trykk Magazine


Du trenger: 

Ca 6 x 12" bazzil

Mønsterpapir i matchende farger, ca ett 12x 12 ark, eller 2 resteark.

Papirpose som måler 27,2x 13,  lim, pynt 
You need: Cardboard, measure: 6x 12 inches, design papers, paper bag, glue, embellishments.

 1. Kutt papirposen 4" høy
Cut the paper bag at 4" 

2. Kutt ut kartong slik: 2 stk 4 1/4"x 5,5", 1 stk 5,5"x 6 1/4, skår den biten som er  5,5"x 6 1/4, skår ved 2 cm på den lengste siden. Kutt kartong i ca 10" x 3/4" (til hank) her kan du også bruke bånd hvis du heller vil.
Cut the card stock like this:
2x 4 1/4"x 5,5"
score the 5,5"x 6 1/4 piece at 2"
Cut one piece of cardboard 10" x 3/4" or use lace or ribbon for the strap


3. Kutt mønsterark som passer til kartongen. F.eks 2 stk Ca 4 1/8" x 5 1/4" og 1 stk 1 6/8" Lim mønsterpapiret på kartongen. Svert kantene først hvis du ønsker det.
Cut the design papers to fit the cardboard. 
I used 2 x 4 1/8" x 5 1/4" and 1 piece of 1 6/8"


4. Lim kartong på papirposen først slik.
Glue the paperbag to the cardboard like this.


5. Brett bunnen ned.

Fold the bottom down.


6. Lim fronten på slik, og lim på mønsterpapir (svert kantene hvis du ønsker det).
Fest stroppen og pynt. 
Glue the front of the bag, and add the patterned paper (distress the edges if you wish).
Attach the strap and trim.

7. Slik ser de ferdige veskene ut.
Jeg har brukt: 
Papirpose, ark fra Pion Design og blå kartong, blomster fra WOC, Spellbinder dies, Martha Stewart punch, tekststempel fra  Norsk Stempelblad AS blonder fra skuffen. Jeg har svertet kantene med Walnut Stain distress ink. 
Here are the finished projects. I used: a paper bag, Pion Design papers and blue cardstock, flowers by WOC, Spellbinders dies, Martha Stewart punch, sentiment stamp is  Norsk Stempelblad AS, lace from stash. I distressed the edges with Walnut Stain distress ink.


Her har jeg fargelagt Magic Tilda Mini med Copics, arkene er , tektstempler fra Norsk Stempelblad AS

dien er fra Spellbindersblomstene er fra WOC, punch fra Martha Stewart. 

 I have colored the Mini Magic Tilda with Copic markers, the sentiment stamps are by Norsk Stempelblad AS,
 I used a Spellbinder die and Martha Stewart punch, and the flowers are by WOC.

Hope you like it! 


Håper du liker den. Takk for at du besøker bloggen min!

Ønsker deg en kreativ dag! 

Thanks for stopping by my blog today! 

Crafty hugs, 

søndag 7. april 2013

DT Ett Trykk- Paperbag card tutorial/ Papirposekort

Hope you are all enjoying your weekend!
I thought I would show you a paper bag card- tutorial I made for the february edition of  Ett Trykk Magazine. This is a simpel design to use if you are giving away some money, or some chocolate, teabags or whatever you like.

Her er en posekort beskrivelse som jeg laget til Ett Trykk i februar. Et enkelt design som passer fint hvis du skal gi penger i gave, eller kanskje en sjokolade eller teposer passer fint! 

Here's the card:
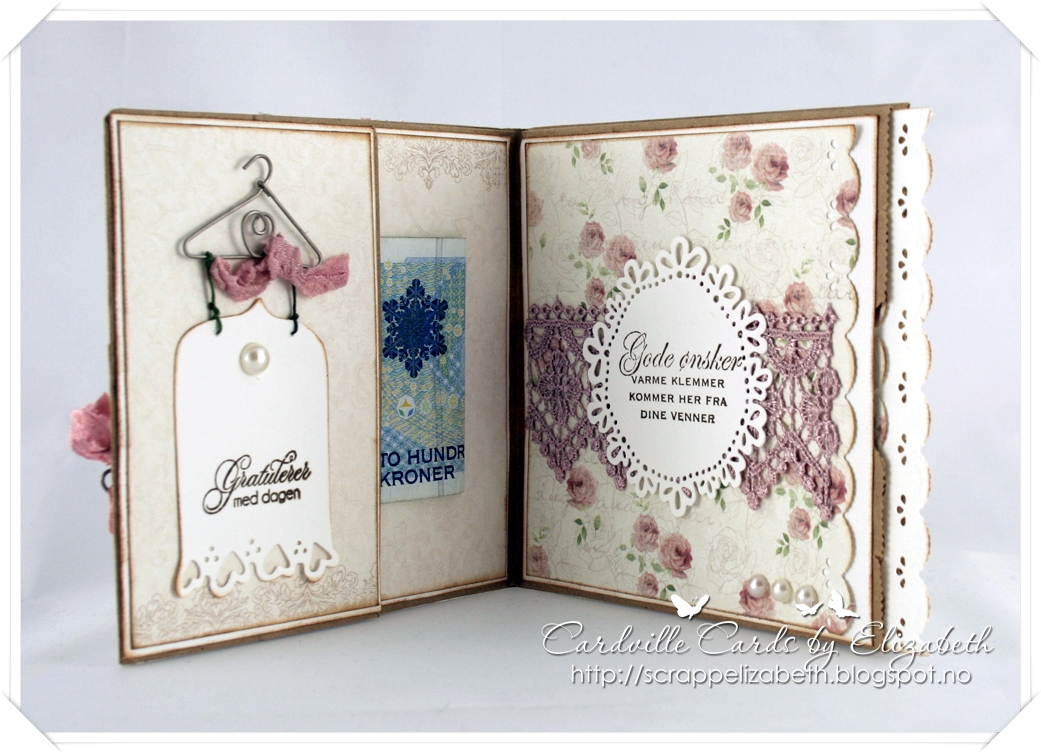
I used some older Maja Design papers called Marika 7. Pearls are by Melissa Frances, the flower are WOC, the tags, mini doily and branch dies are Magnolia- Doohickey's , The love hanger is by Maya Road, the berries  are Kort og Godt. The doily and lace are from my stash. I used a Martha Stewart punch and some beautiful shabby seam binding from the Live & Love craft store.


I colored the Magnolia image Summer flower Tilda with Distress Ink pads and marker. Colors used: skin:  tattered rose, Vintage Photo,  dress: scattered straw. Wings and flower: Victorian Velvet, Black sooth (shadows)


Magnolia stempelet er fargelagt med distress ink pads og markere. 
slik lagde jeg kortet:

Here's how I made it: 
1. What  you need: a paperbag, (mine was 27,2cm  x 13cm), card stock, design papers, punches and embellishments. 
 Du trenger en papipose i størrelse 27,2  x 13. Kartong og mønsterark i machende farger, utstanser, og pynt etter ønske.

2. Start by folding the paperbag. Keep the opening to the right and the bottom part of the bag to your left.
Begynn med å brette papirposen i to. "Flappen" som er undersiden av posen skal være vendt inn på venstre side- papirposens åpning på høyre side. 

3. Measured the card stock and desingpapers to fit all four sides of the paperbag: front, insides and backside. Punch the edges if you like.
 Kutt til kartong og mønstereark til alle fire sidene på posen, og en til undersiden av posen (det som skal bli lommetn). Jeg har valgt å stanse ut kanten på en side av mønsterpapiret.


4. Decorate a tag for a personal message to go in the opening of the bag. The tag should be long enough to show. A centimeter will do.
Lag en tag til å skrive en hilsen på. Lag en tag som er litt lengre enn kortsiden. Denne kan dyttes inn i papirposens åpning.

5. Glue the card stock and dp's to the paperbag. I distressed the edges with distress inks- Walnut stain.
Lim på kartong og mønsterark på alle 4 sider og på lommen. Du kan gjerne sverte kantene først hvis du ønsker det.


6. Add glue on the edges of the inside of the little pocket (the bottom of the paperbag) top and bottom. 
Lim langs den nederste og øverste kanten på "flappen" (det som var bunnen av papirposen) med limpistol eller lignende, slik at det blir en lomme inn hvor pengene kan plasseres.


7. Decorate the way you like it! 
Dekorer kortet etter eget ønske. 

Here's the inside of the card. Sentiment stamps are by Kreativ hobby.
Her er innsiden av kortet. Stemplene er fra kreativ hobby.

Hope you'll give it a try!

Thanks for stopping by my blog today!
And thank you so much for your lovely comments!!!

Crafty hugs, 


lørdag 6. april 2013

New challenge: A creative Romance


Good evening bloggers, 
I wanted to let you know there's a new challenge comming up very soon: 


Please stop by A Creative Romance to become a follower so you won't miss out!
Stay tuned for more details on May 1st!

Crafty hugs, 

onsdag 3. april 2013

DT Midweek Magnolias- How charming!


***

Good morning friends and bloggers,

Thank you so much for all your lovely comments, I love reading every single one of them! 
I would also like to welcome my new followers, thank you for joining me, I hope you find some inspiration around here. I know I do when I'm visiting your blogs! 

It's Wednesday, and time for a new challenge for you over at the Midweek Magnolias.This week we want to see CHARMS on your project
Remember to include a Magnolia stamp or item, and don't forget that we have a limit of 5 challenges total if you want a chance to win the surprise prize from Magnolia in Sweden!

I have been playing with my distress inks again, I love this Tilda with her tulips, so fun to color.
I used both sides of a sheet of Pion Design papers from the Almas' Sewing room collection. The flowers are from WOC and the doily, ribbon and charms are from my stash. I distressed the edges with walnut stain distress ink. Pretty simple stuff really- almost CAS... lol.

Tilda with big tulips is colored with distress ink pads and markers. 
I stamped the image with StazOn Timber brown ink on Canson  300grams watercolor paper.


I used the lovely papers to decorate the inside too.
Hope you like it!

Please stop by the Midweek Magnolias to see the gorgeous creations of the rest of the DT, and to be inspired to join us in our challenge!

Wishing you a wonderful Wednesday!

Crafty hugs,

tirsdag 2. april 2013

GDT PaperNestDolls

Good morning bloggers, 
Today I am doing a GDT spot for the Paper Nest Dolls.
I have had the chance to use several of these super sweet stamps in the past and I must say I love to color them. 

The ones I've used on this gift set are perfect for a child's birthday: 

The stamps I used are the Circus Clown Owen (card), Circus Seal Sammy (tag) and Ringmaster Ellie (bag) all available at the Paper Nest Dolls Digital and Rubber Stamp online Store.
I used cardstock in yellow, orange and red, and Basic Grey papers. I used a Martha Stewart Punch, and the sentiment stamps are Whimsey stamps.

I colored the digistamps with my Copic Markers. Colors used: Skin: E13-11-00-000, R32-30. Hair: E29-27-25-23-30, YR24-23-20, Y11, E31, Reds: R37-35-32-30, Blues: B26-23-21-0000, Yellows YR24-23-20, Y23-21-11, Purple: V09-17-15-12-0000, Greens: G28-25-0000, Greys: C5-3-1-00. For the ground I used: E35-33-31-30, YG95-93-91

Hope you like it!

Wishing you a wonderful day!
Please stop by the Paper Nest Dolls blog to see more of the cute stamps.

Crafty hugs, 

mandag 1. april 2013

Papirplanetens Magnoliablogg


***

Good morning friends and followers. 
The card I want to show you today is for a new Norwegian Magnolia blog, Papirplanetens Magnoliachallenge
I made this spring card for the very first challenge:

God morgen! Dette er det første kortet mitt for Papriplanetens nye Magnoliautfordring. Jeg har laget et kort inspirart av våren som forhåpentligvis er rett rundt hjørnet: 

 I used papers from the new Maja Design Vintage Spring Basic collection. The flowers are WOC and Kort og Godt. The dies are Magnolia doohickeys and the pearls are from Papirdesign.
Jeg har brukt ark fra Maja Designs Vintage Spring Basik kolleksjon, blomster fra WOC og Kort og godt, diesen er også fra Magnolia. 

I used Tilda with big tulip pot image, I colored her with distress ink pads and markers. Colors used: Hair: Antique linen and Walnut stain, Skin: tattered rose, vintage photo, aged mahogany (cheeks), Pants: scattered straw, vintage photo, black sooth. Sweater: Peeled paint, bundled sage, black sooth, Plant: Aged Mahogany, walnut stain, brushed corduroy, black sooth, peeled paint, bundled sage, black sooth, victorian velvet, aged mahogany, black sooth. Shadow: Stormy sky, black sooth. Ground: Frayed burlap.

Jeg har malt stempelet Tilda with Big Tulip Pot med distress ink pads og makere. Jeg har brukt: 
Hår: Antique linen og Walnut stain, Hud: tattered rose, vintage photo, aged mahogany (kinn), Bukser: scattered straw, vintage photo, black sooth. Genser:  Peeled paint, bundled sage, black sooth, Blomsterpotte: Aged Mahogany, walnut stain, brushed corduroy, black sooth, Blomst: peeled paint, bundled sage, victorian velvet, aged mahogany, black sooth. Skygge: Stormy sky, black sooth. Bakke: Frayed burlap.


***
Jeg vil delta i følgende utfordringer:
I would like to enter my card into the following challenges:
You, Me and Magnolia: #10 Spring/Springtime
Deep Ocean challenge: #48 Photo Inspiration (yellow, white, pink, flowers)
***

Da håper jeg du tar turen innom Papriplanetens nye Magnoliautfordring for å delta!
Takk for at du titter innom bloggen min. Nyt den siste påskedagen!
Thanks for stopping by my blog today! 
Wishing you a wonderful creative week! 

Crafty hugs,